Most digital cameras, still, video or webcams, can only capture images when there is sufficient light on the subject. Insufficient light creates hazy and bad quality images. So what do you do when you need to capture images or record videos when there is low or no light at all? Infrared (IR) light can illuminate the subject and you can capture images even in the dark. IR light is actually an electromagnetic radiation whose wavelength is higher than normal light visible to the human eye. This means, when a subject is illuminated with infrared light, humans cannot see it, but a digital camera can capture these images quite well.
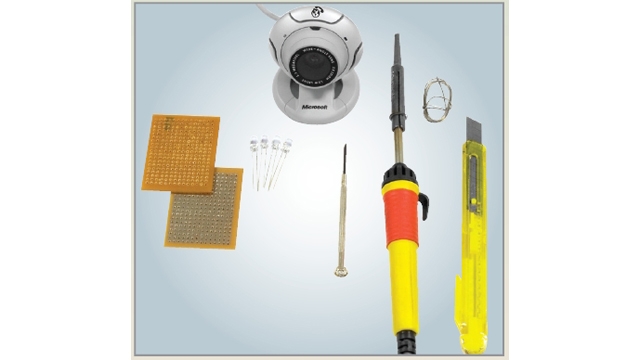
A web camera, a screw driver, a knife or a needle, some IR LEDs, a solder iron, some solder wire, some regular wire, an AC-DC voltage adapter or batteries and veroboard/ general purpose PCB (optional)
The CCD or sensor
The main image capturing chip
inside a digital camera is highly sensitive to infrared light. But there
is an obstacle here—manufacturers of digital cameras implant an IR
filter in the pathway of the lens and the sensor. This filters out
the IR rays so that only pure visible light can pass through. The
reason—infrared light can agitate the image quality and produce
overexposed pictures. This workshop helps you remove the IR filter in
order to get the camera to capture images in the dark. Basically, all
you need to do is remove the IR filter completely. We shall also show
you how to make your own infrared light source so that you can use the
webcam as a surveillance device at night. The best part is that nobody
would even know that there is a camera as nothing is visible in the
dark. Try out this workshop at your own risk.
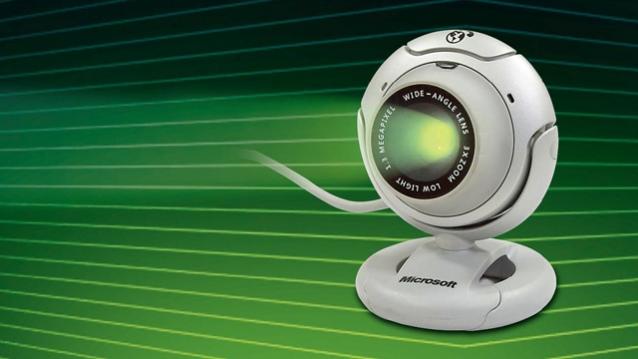
Night Vision Webcam
Hacking the webcam
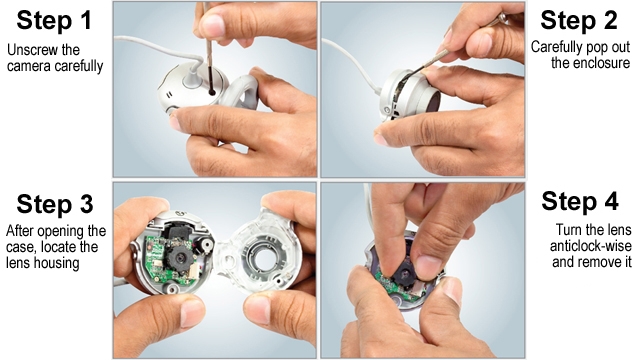
Unplug the camera from the
computer and remove all the screws using a screw driver. You can do this
trick with any still/video/mobile camera too. Open the camera case
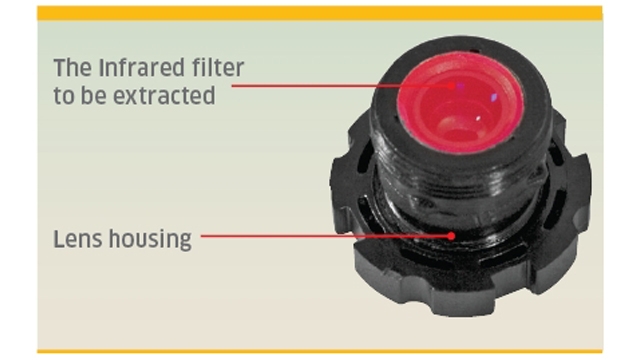
carefully to expose the internal circuit board. Remove the lens housing
by unscrewing it anti-clockwise. Now carefully observe the rear section
of the lens housing and you shall find a red-tinged glass—the IR filter.
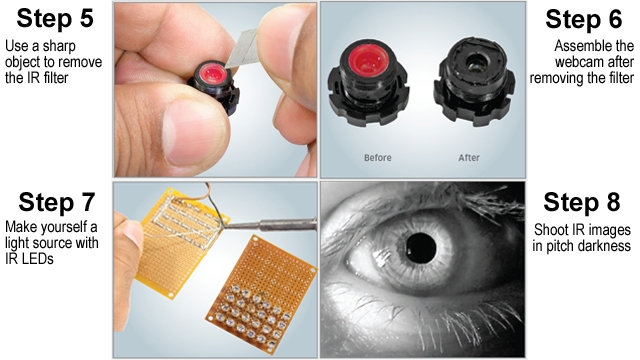
This filter needs to be carefully removed from its place. Pop out the
seal to separate the IR filter from the housing carefully using the
sharp, pointed edge of a knife or needle. Make sure you do not damage
the filter or the seal in case you decide to place it back again. Mount
the lens housing back and close the camera the same way you opened it.
The camera is now ready for action.
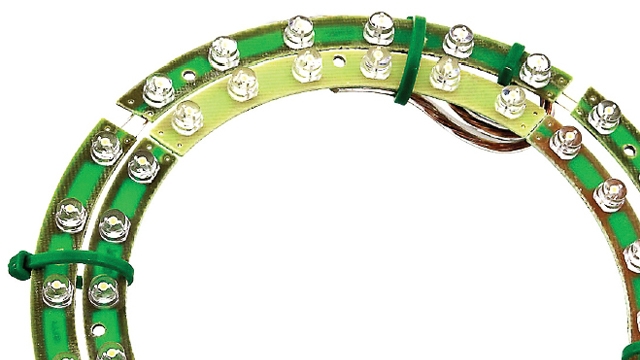
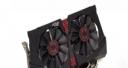
Create a circular LED ring and mount it on your
camera's lens directly. You can make the ring out of plastic/cardboard
or design a custom PCB. Place the IR LEDs on the panel and solder them
accordingly from behind. Using this trick will ensure that the subject
in focus is
completely lit with IR light.
Stealth lighting
Now we show you how to make an
Infrared LED array. IR LEDs are available in any electronic spare parts
shop for around Rs 4 each. You can also rescue some from damaged, old or
discarded IR remote controllers. The amount of LEDs to be used would
purely depend on the amount of light you would require and the voltage
you would be applying to the circuit.
Follow the instructions carefully
Each LED runs on approximately 1.2 Volts DC (confirm the voltage ratings of the ones you buy). So ideally, if you plan on using 12 Volts to power the array, make sure you use at least 10 LEDs in series. Do your calculation and assign the number of LEDs to be deployed on the job. Once done, mount each LED on a veroboard or general purpose PCB and create your LED array. If you are not familiar with electronics and/or soldering, you could ask a friend for help or have the circuit assembled for you by an electronics technician. Solder all the LEDs in serial and finally solder some wires to connect it to the power adapter or battery. Alternatively you can design your own LED arrays. Assemble it on a cardboard or plastic ring and mount it around your camera lens, or create miniature spotlights to spread it around your house. Let your imagination run wild with ideas. If you hack your mobile phone camera, you can use a single IR LED to secretly take pictures at night.
Next set of steps
All done
Now that your camera is hacked and the
infrared array is ready, you need to try out your camera in the dark.
Create a dark environment either by closing all windows and curtains in
your room or wait till sunset. Start a webcam software and switch on the
Infrared LEDs. Observe that what a human eye cannot see is being
captured very easily by the webcam. Infrared pictures captured by the
camera will be in black and white, so don’t panic about the absence of
color detail in the images. You can use an array with a large number of
IR LEDs for a more powerful light throw or use multiple smaller arrays
in different areas to brighten up the whole room/area.
Caution: Continuous exposure to infrared light can be harmful to the human eye. Make sure you do not stare directly into the LED array when switched-on. You would not notice any light, but the eye pupil is wide open in the dark and Infrared light can blast through freely and cause damage too.
What next?
If you have a wireless/Wi-Fi camera,
you can use it as a surveillance camera at night. Use applications such
as ‘WebcamXP’, ‘HandiAVI’, etc, which support motion sensing or time
scheduled image capturing and recording. You can mount it on your main
door, in your garden, in the garage, on the stairway or any place to be
monitored in the dark.
Note: Once the IR filter has been removed, pictures in broad daylight get highly overexposed.
guide, Hacking, How To, LED, night vision, tutorial, webcam, webcams
SMARTPHONES Reviews

Huawei Honor 4X review: Battery life is good, but there are better options under Rs 10,000
Lenovo A6000 review: A good entry level phone with a great display but average camera
NOTEBOOKS Reviews


)